You still remember what my resolution for the year 2012?
Learn more gum paste flowers and refine my piping skills.
I haven't done the brush embroidery techniques in ages and honestly thought I'd almost forgotten how!
So, Today I decided to work on my brush embroidery cookies. I prefer to use cookies over a cake for obvious reasons.
What do you think?
Now, I'm not an expert at this but I'll share with you few tips that I learned along the way.
The Brush - You can actually use any of these brushes, thick or thin. There is no right or wrong.
The choice of brush you use will determine the stroke effect you achieve.
The Icing Consistency - I personally use a soft peak icing, which is a drop thinner than the piping icing.
If you icing is stiff it will not spread and if it is too thin then you won't achieve any stroke effect at all.
I first make my icing as per the recipe to stiff peaks, then I thin it using light corn syrup. It gives it more elasticity. If you want a more thicker icing strokes use a larger tip or pipe two lines at the same time.
Brush Movement - the movement of you brush will also determine your design. If you pull the brush with nice long strokes you will see a very different design then small short strokes.
I hope my explanation is making sense.. or else I'm just talking to my self.
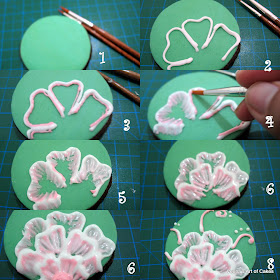
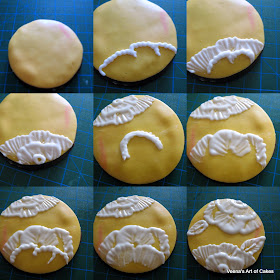
I did take some pictures to share with you.
By the way, there are tons of videos on you tube that show how to do these, I think the best one I saw was username alibeebu from Ali Bees Bake Shop, she has an amazing collection of cookies and tutorials. If you are into cookie decorating she's got some great inspiration for you. I just recently found her blog myself.
Between my home, kids, business, websites and blog I barely get a chance to spend time browsing the internet. I wish I had more time to watch you tube videos and explore more ideas.
Anyway, enough with me whining...
Here's one....
and the progress pictures....
Note I have a white and pink line on the inside. This helps achieve a nice two tone brush stroke.
Here's another...
and the progress pictures....
Here's the last one but no progress pictures.
While I was playing around with the technique, I also wanted to see how a little luster will make a difference and I must say it does bring out flower nicely.
As you can see the yellow cookies has more, the green has very little and the orange has none... no really the orange has none.
Well, that what I did today.
I've been doing so much of fondant covered cakes that I feel I've lost touch with the piping friend in me. Fondant is a lot more easy to work and most popular with customers too.
I don't remember when was the last time someone ordered a piped cake from me.....! really long ago.
That's it for my birthday next month no fondant decorations for me. Has to be a royal icing piped cake.
Last year I was too busy to make one... yeah!
I hope you enjoyed spending time with me. Thanks for stopping by.
Tomorrow I plan to practice some Henna inspired cookies.. Wish me luck.


What recipe did you use? Also did you add luster dust to it?
ReplyDeleteTamar - I used my recipe Chocolate Espresso cookie. The recipe is on my blog here as well as my Royal Icing recipe. I did use luster dust on two cookies. If you read above I mentioned which has more, less and non luster dust. Hope this helps.
DeleteVeena
The royal icing that you're using for the flower is too soft, it makes the image appear wet and sloppy.
ReplyDeleteshauna_gibb@yahoo.com
I just found your blog , facebook and You Tube channel!! Just loving it ..Thanks heaps for sharing all these with hobby cake decorators like us. I will definitely contribute soon, I don't think I'd be able to value any of your tutorials as there are priceless But just what I can afford as a token of appreciation of what you are giving to people like us..
ReplyDelete